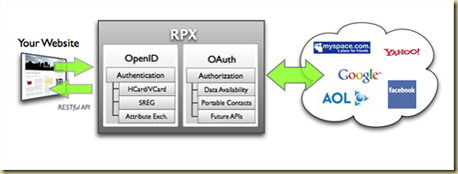
I have been looking into OpenID as a possible identity management system for a website that I might have to build. As a first step, I looked into using the RPXNow webservice to cheat my way into creating a very basic implementation. Why do I say “cheat”, because RPXNow has a very simple interface that allows you to quickly implement OpenID authentication for your website, but on the flip side, it adds another layer between your website and the OpenId provider service (as shown in the following diagram).

In addition, the UI experience is nice, allowing the user to choose the OpenID provider that they wish to authenticate their identity.
Here is how simple it is to implement RPXNow into your ASP.Net website.
The first thing you need to do is go to RPXNow and create an account. In addition you will need to register your domain. (Once you have registered an account, you can test it from your local dev machine).
After you register for an account, you will be able to access a dash-board for your website, where you will be able to generate code, like the one below, to begin using RPX now in your website (This is available under the Quick Start link for your website).
There are two parts to the JavaScript code that you need to add to your ASP.Net webpage. The first part, shown below goes into the head portion of your website. The parts that need customization are:
RPXNOW.token_url: this is the web-page to which will be opened once the user’s OpenID identify has been authenticated.
<script src="https://rpxnow.com/openid/v2/widget" type="text/javascript"></script>
<script type="text/javascript">
        RPXNOW.token_url = http://localhost:51766/OpenIDTest/default.aspx;
        RPXNOW.realm = "aggregatedintelligence";
        RPXNOW.overlay = true;
        RPXNOW.language_preference = 'en';
        RPXNOW.default_provider = "google";
</script>
The next piece of code that you need to include is the following:
<a class="rpxnow" onclick="return false;" href="https://aggregatedintelligence.rpxnow.com/openid/v2/signin?token_url='http://localhost:51766/OpenIDTest/Default.aspx'">
    Sign In </a>
This will add a “Sign In” link to your page. The important piece to note here is the href attribute: It points to your rpxnow signin method page and has a query param called token_url, which is set to the same value as the “RPXNOW.token_url” variable in the script that we included in the header.
Thats all you need to do for the front end ASPX page. The above code will add a “Sign In” link, which when clicked, will pop up a frame that will provide the user a choice of OpenID providers that they can use.
The next step is to add the code that will process the web-page, after OpenID authentication has been successful for the user. The following code can be added to the Page_Load event method. The code checks whether a token was provided as part of the request. (A token in the query params means that authentication was successful). Once the token is extracted, it is sent as a parameter to “https://rpxnow.com/api/v2/auth_info” (in addition, we tell RPXNow how we want them to send back the user information – JSON/XML).
if (!string.IsNullOrEmpty(Request.QueryString["token"]))
{
    //read the token returned by RPXNow, when a authentication occurred successfully.
    //token is returned only when a authentictaion occured successfully.
    string token = Request.QueryString["token"];//token={a big identifier string};

    //Create a web-request that will be used to post the token and the special API key provided
    //to you by RPXNow, to get more information about the authentication.
    WebRequest rpxRequest = WebRequest.Create("https://rpxnow.com/api/v2/auth_info");
    rpxRequest.Credentials = CredentialCache.DefaultCredentials;
    rpxRequest.Method = "POST";

    Stream requestStream = rpxRequest.GetRequestStream();
    StreamWriter streamWriter = new StreamWriter(requestStream);
    streamWriter.Write("apiKey=" + RPNOW_API_KEY);//RPNOW_API_KEY - provided by rpx
    streamWriter.Write("&format=xml");//request response in XML, if omitted - response is in JSON
    streamWriter.Write("&token=" + token); //token - retrieved from the request
    streamWriter.Flush();
    streamWriter.Close();

    //get the response for the request sent to https://rpxnow.com/api/v2/auth_info
    WebResponse rpxResponse = rpxRequest.GetResponse();
    Stream responseStream = rpxResponse.GetResponseStream();
    StreamReader streamReader = new StreamReader(responseStream);
    string responseText = streamReader.ReadToEnd();

    XmlDocument xdoc = new XmlDocument();
    xdoc.LoadXml(responseText);
    XmlElement resp = xdoc.DocumentElement;
    //check if status was ok
    if (!resp.GetAttribute("stat").Equals("ok"))
    {
        Response.Redirect("~/default.aspx?loginStatus=failed");//query param to signal a failure
        return;
    }

    //the identifier returned by RPXNow is what should be stored by you, to keep track of the user
    //remember, when you store the identifier, you need to have a mechanisim where one user
    //can be associated with multiple OpenIDs
    string identifier = xdoc["rsp"]["profile"]["identifier"].InnerText;
    if (!string.IsNullOrEmpty(identifier))
    {
        Session["name"] = xdoc["rsp"]["profile"]["preferredUsername"].InnerText;
        Response.Redirect("~/rpxsignon.aspx?loginStatus=passed");
    }
}//if (!string.IsNullOrEmpty(Request.QueryString["token"]))
With that you have all the code you need to begin using RPXNow in your website.
Having implemented RPXNow, here are some thoughts:
Pros:
1. Its very easy to use
2. The UI experience is compelling and you get it for free
3. Very easy to add to ASP.Net website. (No additional DLLs or resources needed on your web-site).
Cons:
1. RPXNow is another layer that you have added between your website and the OpenID providers. This can be bad if RPXNow goes bust.
2. The extra hop adds a delay.
3. The extra hop can be a security issue (what happens if RPXNow gets hacked). In addition, we have no idea what kind of information they store about the user authenticating themselves via RPXNow.
4. Another big issue – the user is told that they are providing access to a {website_name}.rpxnow.com via the OpenID authentication. This doesn’t look very nice.


2 comments:
The cons are very dangerous. Is there any guarantee that our website will not be hacked via RPXNOW.
Hi,
Thanks for the wonderful article. I did, as has been done here, but, it fails on my machine. After authentication, the response is redirected to the token_url, but with no query string.
I'm using the inbuilt server, do I need to host it under IIS?
Wating for an urgent help.
Thanks
Peeyush
Post a Comment