Team project administration of users in TFS is not easy. A big contributing factor for this is that TFS is made up off multiple applications (SharePoint, Reporting Services and TFS Server) and there is no single tool that manages users across all 3 applications. (Actually, the TFS Admin Tool can do that – but it is extremely buggy and in my opinion does not lend itself well for an enterprise level organization).
So here is what I have come up with based on MSDN documentation and TFS labs (Mostly the labs)
The steps described in this post uses Windows groups to administer Team Project users (administrators and developers). The reason for this is that by adding Windows groups to each application (TFS, SharePoint Server, Reporting Services) rather than adding individual users is that by using groups, it makes it a lot more easier to add new users to specific projects.
There are 4 major tasks that the TFS admin needs to do.
1. Add the local user groups 2. Setup SharePoint 3. Setup Reporting Services 4. Setup TFS team membership
All of these steps must be done only after the Team Project has been created. These steps should be ideally done by the TFSSetup user or a user with similar privileges.
Once the 4 steps have been undertaken, new users (admins and developers) can be added to a project by simply adding them to the appropriate windows user group.
Step 1: Add the local user groups
- Click on Start->Administrative Tools->Computer Management
- Click on Local Users and Groups->Groups folder
- Right click on Groups and select New Group In general, the group name should be specific to your project. Add two groups using the New Group dialog (I like to use the following template)
- TFS_[ProjectName]_Administrators
- TFS_[ProjectName]_Developers
- If you know who is going to work on the Team Project, then add the appropriate users to the above local groups.
By default, the TFSSETUP user is the administrator over all the projects defined in TFS. The TFSSETUP user creates the project using Team Explorer. Once the project is created, you will find that TFS has built a Reporting Services site and a SharePoint portal for your project.
Step 2: Setting up SharePoint
- Visit the Project Portal by right clicking on the Team Project and selecting the “Show Project Portal” option.
- Click on Site Actions menu on the SharePoint web page and select the Site Settings command.
- The next screen that comes up has an option to manage users. Select the People and Groups hyperlink in the Users and Permissions section.
- On the People and Groups page, select New | Add Users from the toolbar.
- Enter the name of the team project admin group that you created in Task 1 in the Users/Groups field.
- Click on the check names button to validate the name you entered.
- In the Give Permission section, under the Give users permission directly section, place a check next to “Full Control - Has full control” and click OK
- Repeat steps 4 to 7 and this time add the team project developers group (that you created in task 1) and instead of giving the group “Full Control” give the user-group the “Contribute - Can view, add, update, and delete” permission.
Step 3: Setting up Reporting Services
- In the Team Explorer right click on the Reports node under the Team Project and select the Show Report Site command.

- The Reporting Services Home page for the selected project is loaded in a browser. Click the Properties tab.
- Click on the Security link
- Click on the Edit Item Security link. (Click ok to dismiss the warning message).
- Click on the New Role Assignment link and add the team project administrators user group to the Group or user name field, set their role as Content Manager, and click OK.
- Repeat the above step and this time add the team project developers user group for the project. Set the role to Publisher.
Step 4: Setting up users in TFS for the Team Project
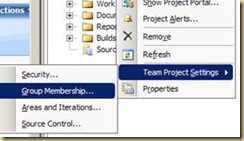
- In the Team Explorer, right-click on the Team Project node and select Team Project Settings | Group Membership.

- Select the Project Administrators group and then click the Properties button.
- Select the Windows User or Group option in the Add member panel, and then click the Add button.
- Enter Team Project Administrators group in the text field, click Check Names to validate. Click OK.
- Click OK
- Repeat steps 2 to 5, but this time choose “Contributors” role instead of “Project Administrators” and add the Team Project Developers group to this role.


No comments:
Post a Comment