
One of the activities one can code with the Tricky bot is the line follower. But how does the line following code work?
Here is the line following code that tricky uses:
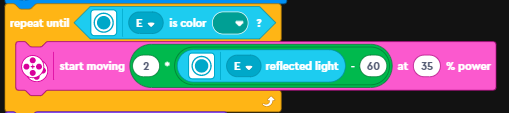
The first line is controls the loop execution and run the line following code until the sensor senses the green piece that is part of the basket.
But what is the the code within the loop doing? In a word: Propotional Line Following Algorithm (ok 4 words!)
Lets break down the code into its various bits:
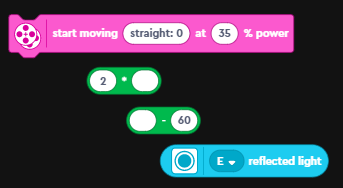 |
| the various bits in that one line of code. order of operations is bottom up |
The code uses the sensor in "reflected light" mode. In this mode, the color sensor reports back the amount of light being reflected back to the sensor. Remember dark colors reflect less light compared to light colors.- Next up is the subtract block. The sensor value is one of the operands and the other operand here (the 60) is the target value.
The idea here is that we want the robot to try and get to the target reflected light value of 60. If it senses more, than it needs to reduce it and if its less, then it needs to increase it. One can call this the "error" value.
The next block is a multiply block. It multiplies the "error" by a constant (in this case 2). One can consider this entire expression upto here, as the "correction value". Here is the complete line:
Next up is the "start moving with steering at power" block. It will move the robot at the specified power (35%) and at the angle defined in the first field. The value we will use for the angle is the "correction value" that we calculated previously. This is what the final line looks like:


How does it all work?
First lets look at how start moving block works. The first input to the block is the direction in which the robot is supposed to move. The values it can take are -100 to 100 (negative values = Left, positive values = Right, 0 = Straight).
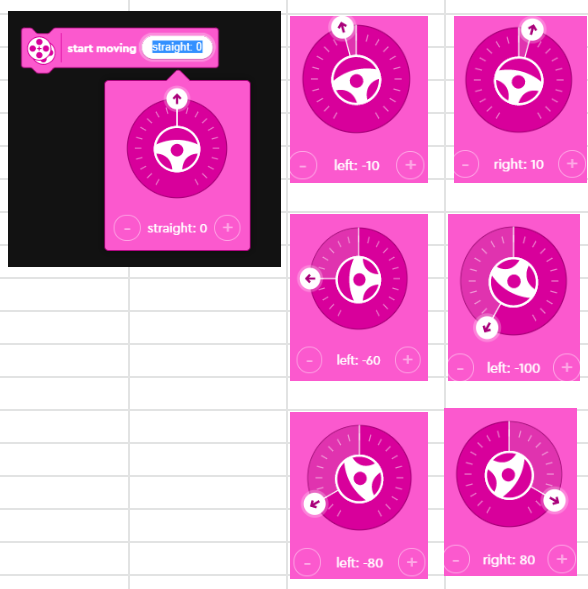

Here are the different values for the output angle based on a target value of 60.
One thing to note is that with a target value = 60 and Kp = 2, the robot will follow the line when placed on the left side of the line. This is because, values above 60 (more white), will make the robot turn right (towards the line) and values below 60 (more black), will make the robot turn left. If you wanted the robot to travel on the right side of the line what do you think you will have to change? (see answer at the bottom).
You can play with the above calculations using Google Sheets: https://docs.google.com/spreadsheets/d/1RHkM3w1KmZSh7D-QXvpsda7rRfRzInH4p_jKrHQJQg0/edit?usp=sharing
When you use this piece of code, you might have to change the value of the target (in this case 60) and the multiplier.
Summary:
Why is this called a proportional line follower? As the robot drifts away from the line, the error value will become larger. We make this error value even larger by using a constant as a multiplier. This error value is then used as the angle to turn the robot. So the larger the difference, the bigger the angle that will applied for steering. Hence the proportional line follower!
So where does the math for all of this come from? There is a concept called PID: Proportional-Integral-Derivative and this concept is used in a lot robotic controllers. In the line-follower, we used just the proportional component of the math. PID uses the following complicated looking formula: 

We used just the first term of the above equation in our code:
If you want to learn more about how PID is used and implemented and the math, read this post of mine: Error Correction using PID (Proportional Integral Derivative) - The Math
You can also learn more about PID here: PID controller - Wikipedia
Answer:
To make the robot travel on the right side of the line, you will have to reverse the output angles. The easiest way to do this is to change the sign of Kp. You would set Kp = -2.
No comments:
Post a Comment