Found this in Bing’s satellite imagery – an airplane taking off from Las Vegas airport.

Saturday, December 24, 2011


Monday, December 05, 2011
Installing a windows service using PowerShell
There is a hard way and an easy way. Here is the easy way:
Use Invoke-Command to call InstallUtil instead of New-Service:
Invoke-Command -ScriptBlock { C:\WINDOWS\Microsoft.NET\Framework\v4.0.30319\InstallUtil.exe /install "path to windows service.exe"}
Invoke-Command is better than Invoke-Item because the result of the execution is piped back to the console. (With Invoke-Item, any error messages don’t get sent back to caller).
Now here is an additional tip – if you need to specify the username and password under which the service should be run, you can use the undocumented InstallUtil parameters: username and password as shown below
Invoke-Command -ScriptBlock { C:\WINDOWS\Microsoft.NET\Framework\v4.0.30319\InstallUtil.exe /username=domain\account /password=password /install "path to windows service.exe"}
Finally, if you need to run this command on a remote machine, use the –ComputerName field that’s part of Invoke-Command
Invoke-Command -ComputerName machineName -ScriptBlock { C:\WINDOWS\Microsoft.NET\Framework\v4.0.30319\InstallUtil.exe /install "path to windows service.exe"}
And to uninstall a service:
Invoke-Command -ScriptBlock { C:\WINDOWS\Microsoft.NET\Framework\v4.0.30319\InstallUtil.exe /uninstall "path to windows service.exe"}
Useful powershell functions for installing, uninstalling, starting and stopping windows services on a remote machine
function StartService()
{
param ([string] $serviceName, [string] $targetServer)
Write-Host "starting service $serviceName on $targetServer"
Invoke-Command -ComputerName $targetServer -ScriptBlock {param($sn) START-Service $sn} -Args $serviceName
Invoke-Command -ComputerName $targetServer -ScriptBlock {param($sn) $servicePrior = Get-Service $sn; Write-Host $servicePrior.status} -Args $serviceName
}
function StopService()
{
param ([string] $serviceName, [string] $targetServer)
Write-Host "stopping service $serviceName on $targetServer"
Invoke-Command -ComputerName $targetServer -ScriptBlock {param($sn) STOP-Service $sn} -Args $serviceName
Invoke-Command -ComputerName $targetServer -ScriptBlock {param($sn) $servicePrior = Get-Service $sn; Write-Host $servicePrior.status} -Args $serviceName
}function UninstallService()
{
param ([string] $serviceName, [string] $servicePath, [string] $targetServer)
Write-Host "uninstalling service $serviceName on $targetServer from path $servicePath"
Invoke-Command -ComputerName $targetServer -ScriptBlock {param($sp) C:\WINDOWS\Microsoft.NET\Framework\v4.0.30319\InstallUtil.exe /uninstall "$sp"} -Args $servicePath
}function InstallService()
{
param ([string] $serviceName, [string] $servicePath, [string] $targetServer)
Write-Host "uninstalling service $serviceName on $targetServer from path $servicePath"
Invoke-Command -ComputerName es1sbweb -ScriptBlock {param($sp) C:\WINDOWS\Microsoft.NET\Framework\v4.0.30319\InstallUtil.exe `
/username=domain\username /password=password `
/install `
"$sp"} -Args $servicePath
}
SqlComplete–A must have add-on for Sql-Server users
If you use Sql-Server, then you must get SqlComplete for its awesome intellisense that it provides within Sql Server Management Studio (SSMS).
One of the best things I like about it: Regular SSMS intellisense will not work in SqlCmd mode. SqlComplete works even in SqlCmd mode. (And for me that’s huge, because I open all my query windows by default in SqlCmd mode). In addition it provides you with the ability of formatting your entire t-sql document (awesome!).
SqlComplete has two editions: a free edition that has reduced functionality (Not as great document formatting capabilities) and a standard edition that costs $99 (edition differences). I really wished that they had a personal edition for $50, cause I would definitely buy this tool.
Also remember to install the other awesome SSMS add-on: SSMS Tools, which provides some other useful features that make SSMS a pleasure to work with.
More info:
SqlComplete – Alternative to SSMS intellisense: http://www.devart.com/dbforge/sql/sqlcomplete/alternative-to-ssms-intellisense.html
Downloads: http://www.devart.com/dbforge/sql/sqlcomplete/download.html
Sunday, December 04, 2011
PlasticSCM–First encounters
I was looking for a source-control system that I could use at home, which meant that TFS would not be a good candidate for me (although it’s the SCRM that I have the most experience with). I have tested out SVN and Mercurial, but for some reason they didn’t grow on me.
Today I came across PlasticSCM (via a recent blog post regarding their new release 4.0). So I decided to give it a try. (The main reason being that it’s a distributed SCM and based on what I had seen on PlasticSCM’s website, the visualization tools were very good and it also had decent integration with Visual Studio). Another thing that I liked is that the free community edition allows you to use it with up to 15 users free of charge.
So here are some things I found out (based on usage with Visual Studio): (Remember these are just first impressions and this is also my first true usage of a distributed SCM).
- I found having a separate repository for every solution was the way to go. When I first tried it out, I used a single repository and added all my solutions to that repository. (Each solution represented a completely distinct project). But it started getting very confusing, as I had to perform all sorts of merges everytime I opened a solution.
Instead, when I created a separate repository for every solution (or group of solutions that represented the same project), things began working in what I considered a more predictable way. - I use Resharper and when I first added a solution to PlasticSCM, I had trouble everytime I closed the solution, as the file .user files could not be saved. In addition, PlasticSCM attempted to check-in all the Resharper temporary files. Currently, I am deleting these files after I add the solution to PlasticSCM and then check the files in. Also, once I have done that, I set PlasticSCM to ignore the *.user files and the _Resharper.* folder.
- Although I havent performed much branching and merging as of yet, I found the visualization tools pretty cool
Some useful tips:
First thing to do is set PlasticSCM as the current Source Control Provider:

Next open up a solution that you want to put into source-control. Right click on the solution and select the “Add to source control” item.

This will bring up the New-Workspace dialog. Create a new repository for your solution (click New).


When you click on OK, it will automatically add the solution into PlasticSCM (into the newly created repository).
Now bring up the PlasticSCM client application (via the Start Menu).

You will find that a new Workspace has been created for the solution:

Click on the Items node in the left pane and then ensure that all the files that should be under source-control, show up with a status of “Controlled”.

You do this by selecting any item that is setup as “private” and select the “Add to source control” option.

Your final step is to check in all the files. This is done by selecting the “Pending Changes” option in the left pane and then clicking the “Check-in” button.

That’s it. Your solution is now under source-control.
What does PlasticSCM check-ins look like?
Here is an example: I had a main branch. I created 2 separate branches from main to represent 2 sets of changes that I wanted to make: Add a multiplication feature task and Add a division feature task. Both of these features were to be added to a single change-set in main (the most current changeset).
The 2 features represent coding tasks that 2 separate developers may be involved with. Once the 2 features are completed they are checked into their respective branches. After the features are checked into the branches, the branches are merged one by one into the main line.
And here is what the above scenario looks like:

Some final thoughts:
- There doesn’t seem to be any in client help for PlasticSCM. So many times I had to go about exploring trying to attempt to do various tasks in PlasticSCM (for example setting the current workspace – there doesn’t seem to be a way to do this in the branch-explorer. Instead you do it via the Branches view).
- During merges, I found that PlasticSCM didn’t do a lot of stuff automatically. I was always provided a diff/merge view (which was very beautiful in its rendering), and had to manually accept the merges. On large projects, this will become quite painful for the person incharge of merging various changesets into the main-line.
- I definitely like PlasticSCM and will continue testing it out on my personal projects. I think it will be cool for large teams, but I am not entirely sure whether it’s a good replacement for TFS (which we currently do use at work). I plan on figuring this out as I work more with PlasticSCM.
Saturday, December 03, 2011
Installing DD-WRT on TP-Link TL-WR841N

TP-Link’s TL-WR841N router supports the DD-WRT firmware.
The installation process is simple:
Go to DD-WRT’s homepage and search for the router from the Router Database page. Although you will not find TL-WR841N firmware, you can use the TL-WR841ND files. My router uses v7, so that’s the version of the firmware that I downloaded.
You can use the following link to download the files (if you are using v7 of the router):
http://dd-wrt.com/routerdb/de/download/TP-Link/WR841ND/7.0/factory-to-ddwrt.bin/3849
http://dd-wrt.com/routerdb/de/download/TP-Link/WR841ND/7.0/tl-wr841nd-webflash.bin/3850
Upgrading the router’s firmware is simple: (Remember, when upgrading firmware, always be connected to your router through an ethernet cable, as you will loose WiFi connectivity once the firmware has been updated. After the update, you will have to reset your wifi settings).
Under System Tools, select the “Firmware upgrade” link

Choose the “Factory-To-DDWRT.bin” file that you just downloaded and click the upgrade button. Wait for about 5 minutes. DD-WRT should be installed and should come up if you browse to http://192.168.1.1/
Next go to the DD-WRT Administration page and select the Firmware tab. Install the 2nd firmware update file “TL-WR841ND-Webflash.bin” that you downloaded.
That’s it – you now have TL-WR841N v7.0 running DD-WRT firmware.
The final step will be for you to go through the setup process and define your Wifi settings.
Reverting to TP-Link’s firmware:
If you need to revert to TP-Link’s firmware, then you need to download the appropriate file from: “http://www.dd-wrt.com/phpBB2/viewtopic.php?t=85237&postdays=0&postorder=asc&start=5”. Remember, to be able to download the file you need to create an account on that website. (After creating the account and logging in via the Quick Links button, you should see the file download link).
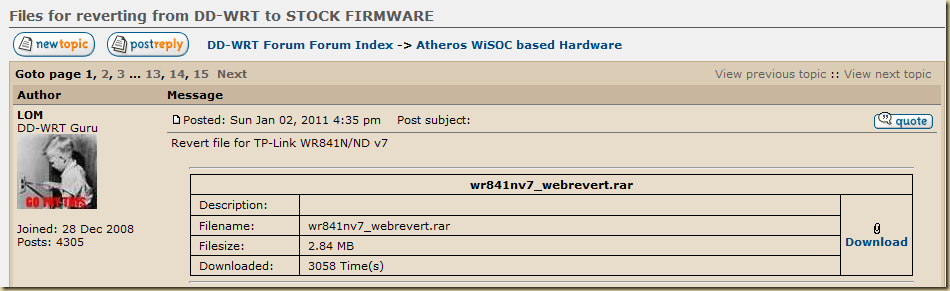
Download and unzip the contents of the “WR841Nv7_webrevert.rar” file. You will find a bin file within the RAR file. Go to DD-WRT and use the upgrade option to upload the “wr841nv7_webrevert.bin” file. After clicking the upgrade button, you will have to wait about 5 minutes for the router to reboot and complete installation.
After you have reverted the firmware, download the latest TP-Link firmware from TP-Link’s website and upgrade the firmware to that version.
Monday, November 21, 2011
Shape Catcher–Unicode character recognition
Came across ShapeCatcher, a useful site that allows you to draw a shape and it suggests different unicode characters that match that shape. Definitely beats looking through Window’s CharacterMap looking for that font that looks like a clock.

Or searching for the peace symbol:

Friday, November 18, 2011
Setting up FTP under Windows Server 2008 R2 with user-isolation
In Windows Server 2008 R2. (Important these are not steps for a production environment. Just for setting up a test FTP server.)
In Server Manager:
Under Roles, click Add Role
install FTP
Under roles - add Web Server (IIS)
Under role services select FTP Server
Complete the installation
In IIS: Create a FTP Site:
Right click on Sites and select Add FTP Site
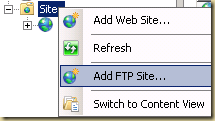
Name it: Whatever you like
Path: C:\inetpub\ftproot

Bindings and SSL Settings
Select No SSL

Authentication information
Select Basic authentication
Select Allow access to "All users" with Read and Write permissions
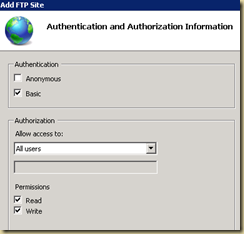
Finish the FTP creation wizard
Under settings for the FTP site (in IIS)
Select FTP User Isolation
Select "User name directory (disable global virtual directories)"


Accounts:
Create local user accounts (this is how users get access to the FTP site (or at least one way how you can provide access to your ftp site)). (example: create a local account named FtpUser1)
Create a group called FTPUsers and add user accounts created above to the group. (it makes it easier to provide access to folders as shown in the next step).
Provide the group you created in the above step (FTPUsers) modify priviledges on C:\inetpub\ftproot
Next create a sub-folder called LocalUser (C:\inetpub\ftproot\LocalUser). (important to name it exactly that).
Create a folders for each of the user accounts you created above (eg: if you created an account call FtpUser1, create a folder under LocalUser called FtpUser1).
Test:
Test access to your FTP site via your favorite FTP client. If you did everything correctly, you should have a valid FTP site with an account setup.
In Server Manager:
Under Roles, click Add Role
install FTP
Under roles - add Web Server (IIS)
Under role services select FTP Server
Complete the installation
In IIS: Create a FTP Site:
Right click on Sites and select Add FTP Site
Name it: Whatever you like
Path: C:\inetpub\ftproot
Bindings and SSL Settings
Select No SSL
Authentication information
Select Basic authentication
Select Allow access to "All users" with Read and Write permissions
Finish the FTP creation wizard
Under settings for the FTP site (in IIS)
Select FTP User Isolation
Select "User name directory (disable global virtual directories)"
Accounts:
Create local user accounts (this is how users get access to the FTP site (or at least one way how you can provide access to your ftp site)). (example: create a local account named FtpUser1)
Create a group called FTPUsers and add user accounts created above to the group. (it makes it easier to provide access to folders as shown in the next step).
Provide the group you created in the above step (FTPUsers) modify priviledges on C:\inetpub\ftproot
Next create a sub-folder called LocalUser (C:\inetpub\ftproot\LocalUser). (important to name it exactly that).
Create a folders for each of the user accounts you created above (eg: if you created an account call FtpUser1, create a folder under LocalUser called FtpUser1).
Test:
Test access to your FTP site via your favorite FTP client. If you did everything correctly, you should have a valid FTP site with an account setup.
FTP 7.5 on Windows Server 2008 R2
If you search for enabling FTP on Windows Server 2008, you most often get redirected to the following site:
http://www.iis.net/download/FTP
And if you download that FTP7.5 installer referenced on that page and try and run it, you get the following error:

(this version of the operating system is not supported. FTP Service for IIS 7.0 can be installed only on Windows Server 2008).
Turns out that, for Windows Server 2008 R2, you don’t need to download a separate installer. You just need to enable the FTP role. (This is because on Windows Server 2008 R2, you get IIS 7.5 and not IIS 7.0).
More info: http://learn.iis.net/page.aspx/263/installing-and-configuring-ftp-7-on-iis-7/
Wednesday, November 16, 2011
Powershell–Run script via context menu
I wanted the ability to right click on a PS1 file and then execute a powershell script. (A “run powershell script” from Context-Menu option)

So here is how you can do it:
Copy the following text into a text file and save it:
| Windows Registry Editor Version 5.00 [HKEY_CLASSES_ROOT\*\Shell\Run with powershell] [HKEY_CLASSES_ROOT\*\Shell\Run with powershell\command] |
Save the file and rename it to have an extension “.reg”. Now double click the file and you will have a context menu called “Run with powershell”
To make life easier you can download my version of the file from:
https://docs.google.com/open?id=0BzvtUeIvT94wMzg1MWRjZjEtZTUyNi00YTlkLWJhMDUtYjczMTljYzdmNmYy
Monday, November 14, 2011
SqlBulkCopy error: given value cannot be converted to type xxxx
If you get the following error when using SqlBulkCopy: “The given value of type String from the data source cannot be converted to type int of the specified target column.”
Then check for 2 things:
Make sure that you are not setting more characters than what is allowed for a field (i.e., column allows only 5 characters and you set the column to 6 characters).
If you are not setting all the columns, then make sure you use the “SqlBulkCopyColumnMapping”, to setup the mapping (especially true, when you are inserting rows and you are not setting the primary key value as its setup to be an identity column).
Subscribe to:
Posts (Atom)