Wednesday, September 26, 2018

LogicApp–HttpRequest trigger: retrieving query parameters

With a Http request based trigger, how do you retrieve the query parameter values (eg: &queryParamName=hello%20world)? I did not find an answer easily on the internet, so here it is:

@triggerOutputs()['queries']['queryParamName']

image

The above example, will retrieve the query param value for a query param named “queryParamName” and return it as a response.

Another way to achieve the same thing, but in a simpler manner is to use the RelativePath:

image

When you add the relative path, you will have to get the updated HTTP Get URL (that gets generated for you) and in the URL you will find

invoke/queryParamName/{queryParamNameVar}

To call the logic-app, all you have to do is replace the bolded section with a value (invoke/queryParamName/hello%20world/.

I prefer using the relative-path method, because you will find that the logicApp designer will make the variable (in this case queryParamName), easily available to other actions, which is not just nicer, but also protects you from typos.

Wednesday, September 12, 2018

Databricks–Using Databricks Secrets

Here are all the steps needed to setup a secret in databricks (not key-vault) in Databricks. This works with the standard version of DB:

Install Databricks CLI:
1. install databricks cli (needs python)
     pip install databricks-cli
2. Setup databricks token (needs token from user-settings in Databricks. Also needs the host url: eg Host: https://northcentralus.azuredatabricks.net)
     databricks configure --token
3. Create a scope
     databricks secrets create-scope --scope dbSecretsScope --initial-manage-principal "users"
4. Add a key-value to scope
     databricks secrets put --scope dbSecretsScope --key mydbPassword --string-value myPasswordValue
5. List keys in scope
     databricks secrets list --scope dbSecretsScope


Create a Python notebook and add the following code in a cell and run it


sqlserver = xxxxx.database.windows.net'
port = '1433'
database = 'myFirstDb'
user = 'iamspecial'
pswd = dbutils.secrets.get("dbSecretsScope","mydbPassword")
print "password is", pswd #will display redacted – very important!
table = 'myFirstTable'

## Load Data Frame ##
df1 = spark.read \
   .option('user', user) \
   .option('password', pswd) \
   .jdbc('jdbc:sqlserver://' + sqlserver + ':' + port + ';database=' + database, table)

df1 #to display the dataframe to make sure we connected

Tuesday, September 04, 2018

Dynamics Error: Only owner can revoke access to the owner.

Error: Only owner can revoke access to the owner. CallerId: xxxxxx, OwnerId: yyyyyyy

I was getting this error when attempting to revoke access from yyyyyy via code on an account entity. What I found out was that while yyyyyy was the owner of the entity, I could successfully revoke access from the entity.

Instead, I first had to assign the entity to the new owner (xxxxxx) and only then could I revoke access from yyyyyy.

Tuesday, August 21, 2018

Dynamics CRM–debugging when using executionContext

Xrm.Page is being deprecated and one needs to pass the executionContext to the javascript function to get at the data that was available from Xrm.Page. But, how do you test your function from the browser’s debbuger?

What I do is I create my own executionContext variable and then pass it to my js function to see how it would work.

fakeExecutionContext = {
     getFormContext: function(){return Xrm.Page;},
     context: Xrm.Page.context
}

and you would call it like this:

myTestDynamicsFunction(fakeExecutionContext);

Thursday, August 16, 2018

Azure PowerShell Error: Please provide a valid tenant or a valid subscription

You might get the “Please provide a valid tenant or a valid subscription” error when running some Azure powershell commands (I got it when I ran “Get-AzSKAzureServicesSecurityStatus”).

The first thing to make sure is that you have at least version 5 of PowerShell. You can find this by running “$PSVersionTable” and making sure your PSVersion value is 5.0 or greater.

In my case, what I found out was the reason I was getting this error was that the subscriptionid I was providing was not the same one as the account that I was logged in on the computer. So, what I had to do was to log in to Azure using “Login-AzureRmAccount”. Once I had done that, running the command worked flawlessly.

Thursday, August 02, 2018

Azure Logic Apps–Sql Server Triggers being skipped

I was trying to use the Logic Apps “Sql Server” trigger (When an item is created), and the trigger was always being skipped.

After much testing and looking, I found the following requirements for a SQL Server trigger: https://flow.microsoft.com/en-us/blog/introducing-triggers-in-the-sql-connector/

Limitations

The triggers do have the following limitations:

  • Table must have an IDENTITY column for the new row trigger
  • Table must have a ROWVERSION (a.k.a. TIMESTAMP) column for the modified row trigger


A table with the following definition will trigger LogicApps, when data is added (or updated, based on the type of trigger you use):

CREATE TABLE [dbo].[Test2](
     [Id] [int] IDENTITY(1,1) NOT NULL,
     [RowVersion] [timestamp] NOT NULL,
     [Message1] [nvarchar](50) NOT NULL,
     [Message2] [nvarchar](50) NOT NULL,
  CONSTRAINT [PK_Test2] PRIMARY KEY CLUSTERED
(
     [Id] ASC
)WITH (STATISTICS_NORECOMPUTE = OFF, IGNORE_DUP_KEY = OFF) ON [PRIMARY]
) ON [PRIMARY]

Its unfortunate that LogicApps works without any errors, when you dont have an identity and a rowversion column defined on your table. It would have saved me some time if it had!

Monday, July 30, 2018

Icons for Dynamics CRM

FlatIcons.net is a great resource for free icons for Dynamics CRM.

I have found the following settings work best: (you need a 16x16 and 32x32 icon and I use 0 padding on both).

The icon color is set to 656565.

image

And here is an example of how it looks

image

Monday, July 23, 2018

Dynamics CRM–My Apps link is gone. Fixing access to apps

Not sure if this is a v9.0 issue or not, but I dont have the “My Apps” link, which is needed to manage applications available to your organization (specifically, I needed to manage roles to hide some of the apps from users).

image

To fix this:

  1. Open the default site map:
    1. Go to Customizations >> Customize the System
    2. Client Extensions
    3. Open the “Site Map”
  2. Add “My Apps” link
    1. Select the Settings area.
    2. Drag a “Sub Area” onto one of the groups (I added mine under “Customization”)
    3. Set the following values:
      1. Type: URL
      2. URL: /tools/AppModuleContainer/applandingtilepage.aspx
      3. Title: My Apps
    4. Save and Publish.

You should now have a link to My Apps:

image

And you should be able to fix the roles via:

image

Friday, July 06, 2018

SLAs behind the scenes

To understand how SLAs work, its good to follow along how things get setup on a new entity that is enabled for tracking SLAs.

image

  1. First lets go over the 3 entities that define the SLA:
    1. SLA: This is the main SLA record. This entity records whether its the default SLA, to which entity it applies, etc. In addition it has a collection of 1 or more SLA Items:
    2. SLA Item: The SLA item contain information as to what criteria should be used to apply the SLA Item (each of which can define a different criteria under which they apply (Applicable When) and each of which may have a different set of time limits and actions. The SLA item also tracks which field on the entity it is supposed to update (this is used by the SLA KPI instance). In the above case, the SLA Item would be pointed the new_resolvebykpi. One could add more than one SLA KPI field.
    3. SLA KPI Instance: When the entity gets created, a SLA KPI instance is created to track the SLA. This SLA gets the details based on the SLA and SLA-Item records at the time of the entity creation (an important thing to remember, as changes dont get applied retro-actively to existing SLA KPI instances). A separate KPI instance will be created for each KPI being tracked on the entity.
  2. When you enable an entity for SLA: (Red boxes)
    1. The entity gets a lookup field created called SLAID, that points to the SLA
    2. In addition, on the SLA KPI Instance entity, a new N:1 field is setup that allows the SLA KPI Instance to point at the entity on which the SLA is being tracked.
  3. When you add a KPI field (you do this by setting it up as a lookup to SLA KPI Instance) (green box)
    1. The new field allows CRM to track each KPI separately.
  4. Workflows that manage the SLAs:
    1. Once the SLAs have been created and a new entity is created on which an SLA is being tracked, the work-flows fire and setup the fields on the SLA KPI Instance records based on the SLA details.
    2. These workflows can be found by performing the following advanced find:
      image
    3. Something to note: You will find multiple work flows when you run your search. If you sort it by status, lets first go over the workflows that are in activated status:
      1. There is one workflow that will have the name of your SLA. This is the main workflow and is invoked by the system and creates the SLA KPI Instance records. It also updates the SLA KPI Instances based on pause statuses, etc.
      2. There is a workflow for each of the SLA items you created. These workflows have wait steps that allow the workflow to track the Warning timeout and failure timeout values. These workflows look basically like this:
        image
        These workflows run in the background and hence there can be timing issues and the UI doesnt always update when the timers run out. This is the same reason that when you perform a resolution action (Such as setting a boolean field like First Response Sent), it doesnt update the UI immediately and you sometimes have to refresh the UI to see the updated status.
      3. Finally, you will find that there are some workflows that are in a draft status. Everytime, the SLA is deactivated and reactivated, it creates a new copy of the Workflows and deactivates the old ones. This does clutter the system and I have not found a way to clean up these old workflows. My best guess is that these workflows are kept around for historical purposes. I am not sure if a background process comes along and deletes these workflows later.

Enabling an entity for SLAs

For a quick intro, first read: http://blog.aggregatedintelligence.com/2018/07/creating-enhanced-sla.html

Enhanced SLAs allow you to track SLAs on any entity. For this example we will use the “Workflow” entity (which behind the scenes is pretty much a custom entity).

  1. Enable the entity to track SLAs:
    1. Go to customizations and then open the General tab for the custom entity you wish to work with (in this case, I am doing it for “Work Order”).
      1. Doing this adds 2 new fields on the entity: slaid and salinvokeid
  2. Add a KPI field:
    1. Now that entity is enable for KPI, you need to add a KPI Instance field. Lets add one to track the resolved by KPI.
    2. Under “fields” Click on New.
    3. Set the following values:
      1. Display Name: Resolve By KPI
      2. Name: xxx_ResolveByKPI
      3. Data Type: Lookup
      4. Target Record Type: SLA KPI Instance
    4. Click Save and Close
  3. Publish the changes
  4. Setup an SLA
    1. Go to Settings >> Service Management >> Service Level Agreements
    2. Click on New. Under entities, you should see your custom entity (in this case Work Order). If not, check step 1.
    3. Click Ok. Leave the defaults on the next screen and click “Save”
    4. Add a new SLA Item by clicking “+” under “SLA Details”
    5. Set the following values:
      1. Enter name: SLA Resolve By – Default
      2. SLA KPI: Resolve By KPI (If you dont have anything in the drop down, check step (2)).
      3. Applicable When: leave empty
      4. Success Criteria: I am tailoring this for Work Order, but you could simply choose Status: Inactive, etc
        Work Order >> System Status >> Equals >> Open – Completed; Closed – Posted
        image
    6. Setup SLA Item Failure and Item Warning values (I used: 3 days and 1 day respectively).
    7. Click Save and Close.
    8. Activate the SLA and set it as default.
  5. Add the SLA KPI quick view to the custom entity form.
    1. Open the custom entity form (in this case Work Order).
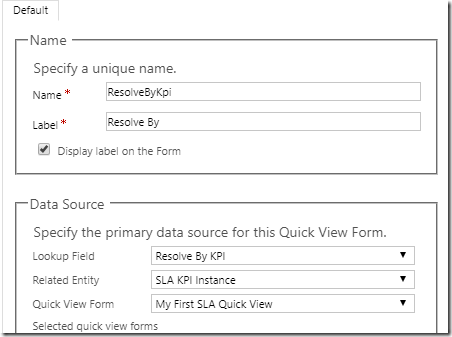
    2. Insert a “Quick View Form”
      image
    3. Save and publish

Testing:

  1. Create a new record for your custom entity (in this case, I created a work-order)
  2. You should see your SLA details:
    image
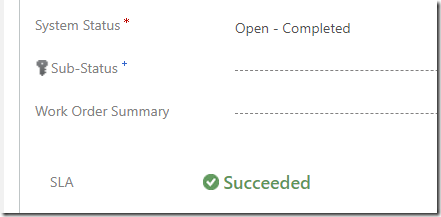
    And after the System Status was set to Open – Completed:
    image
    Note: You will likely have to refresh for the timer to go away, as there seems to be a bug or a timing issue with UI (the data itself is all correct).

Notes:

As of this blog post, here are some limits you need to be aware of (and they only apply to the online CRM instance):

  • The maximum number of entities that can have active SLAs for your organization is 7.
  • The maximum number of SLA KPIs allowed per entity for your organization is 5.