- Create a logic app and add whatever trigger you need. (I used a recurrence based trigger, but you could use a HTTP request, etc).
- Add a new step and then look for Azure Resource Manager. Once you click on it, search for "Invoke" and pick the "Invoke Resource Operation" action.

- You will need to fill in the following parameters and here is how to find them:

- Subscription: This should be available in the drop-down. Else, its your subscription Id.
- Resource Group: The resource group in which your web-app resides
- Resource Provider: Microsoft.Web
This I figured out from this page: Resource providers for Azure services
Microsoft.Web because I needed to manage an App Service. - Short Resource Id: this I figured out by going to the "Properties" section of my App Service and its the in the "ResourceId".

The value will end up being something like "sites/xxxxxxx" - Action Name: Lets look at this param before the ClientAPIVersion.
The function we want to invoke is "Restart" which I found via the REST API documentation pages: https://docs.microsoft.com/en-us/rest/api/appservice/webapps
Restart: https://docs.microsoft.com/en-us/rest/api/appservice/webapps/restart
You can check out all the other parameters that one could provide. In this case, we dont need any additional parameters. - Client Api Version: This is date value and you can get it from the Restart API documenation page. Its called "API Version" and can be found at the top of the page. In my case, as of writing of this post the value was "2019-08-01".
- Final result will look like this:

- Test it out by clicking run.
Tuesday, January 07, 2020
Restarting a web-app using Logic Apps
Wednesday, October 09, 2019
Querying Dynamics CRM using PowerBi - Query Folding
As an example:
When you look at the query in the Advanced Editor, this is what it shows:
let
Source = Cds.Entities("https://xxxx.api.crm.dynamics.com/api/data/v9.1/", [ReorderColumns=null, UseFormattedValue=null]),
entities = Source{[Group="entities"]}[Data],
territories = entities{[EntitySetName="territories"]}[Data],
#"Filtered Rows" = Table.SelectRows(territories, each [createdon] > #datetimezone(2019, 10, 1, 0, 0, 0, -6, 0)),
#"Removed Other Columns" = Table.SelectColumns(#"Filtered Rows",{"createdon", "name"})
in
#"Removed Other Columns"
And this is the query that goes out (removed url encoded characters for legibility):
/api/data/v8.2/territories?$filter=createdon gt 2019-10-01T00:00:00-06:00&$select=territoryid,createdon,name&$top=1000
As you can see, even though the query was broken out over 4 steps, there was only one call that went out to CRM, which is very cool!
Thursday, May 23, 2019
Merge options provided by Visual Studio DevOps
| Merge (no fast forward) Nonlinear history preserving all commits git merge pr where “pr” is the name of the branch. | |
| Squash Commit (in AWS CodeCommit this is called Squash and Merge) Linear history with only a single commit on the target Deleting the source branch when squashing is recommended git merge pr --squash | |
| Rebase (in AWS CodeCommit this is called Fast Forward Merge) Linear history with all commits rebased onto the target git rebase master git merge pr --ff-only | |
| Semi-linear merge (in AWS CodeCommit this is called 3-way Merge) Rebase source commits onto target and create a two-parent merge git rebase master git merge pr --no-ff |
For more info:
Wednesday, March 20, 2019
PowerBi DataFlows–Filtering by Date
The cool feature of incremental refresh is only available to PowerBi Premium instances. So, what do the poor folk do? Well, we fake it!
The following is based on Dynamics CRM data, which provides the modifiedon field for all entities, but it can be extended to use any date field. You simply use the Table.SelectRows function to filter based on the ModifiedOn field. (the example shows how I did it on the “SystemUser” entity).
let
Source = Cds.Entities(https://xxxxx.crm.dynamics.com, null),
#"Navigation 1" = Source{[Group = "entities"]}[Data],
#"Navigation 2" = #"Navigation 1"{[EntitySetName = "systemusers"]}[Data],
#"Changed column type" = Table.TransformColumnTypes(#"Navigation 2", {{"modifiedon", type datetime}}),
#"Filtered By Date" = Table.SelectRows(#"Changed column type", each DateTime.From([modifiedon]) >= DateTime.From("2018-01-01"))
in
#"Filtered By Date"
Tuesday, March 05, 2019
Tuesday, February 19, 2019
Account limits for Application Users in Dynamics 365
All application users are created with a non-interactive user account, however they are not counted towards the five non-interactive user accounts limit. In addition, there is no limit on how many application users you can create in an instance.
https://docs.microsoft.com/en-us/dynamics365/customer-engagement/admin/create-users-assign-online-security-roles#create-an-application-user
https://github.com/MicrosoftDocs/dynamics-365-customer-engagement/commit/9068938aa7ca91f12b8744518bf5071ec4514530#diff-184905bb3786c535b8e1eedb5ba54cf2R258
And for the steps to create the Application user, see: https://blog.aggregatedintelligence.com/2017/02/headless-authentication-against-crm-365.html
Monday, February 11, 2019
Modelling Dynamics 365 SystemUser hierarchy in PowerBI
The SystemUser entity in Dynamics 365 is a self referencing entity, that defines its hierarchy based on the parentSystemUserId field.
So how do you go about showing the hierarchy and utilizing it in report?
Here is one way that I found, that utilizes the DAX Path function.
- Go to the data view and select the “SystemUser” table.
- Add a new column and define your first field using the following function.
ManagerHierarchy = Path(SystemUser[systemuserid],SystemUser[parentsystemuserid])
This will add a column that lists all the managers of a systemuser, delimited by the pipe character “|” - Add another new column to show the depth of the current user
HierarchyDepth = PATHLENGTH ( SystemUser[ManagerHierarchy] )
This will add a column with integer values starting at 1 and going up to the max-depth of the record found in your system - Next, add columns, for each of the following functions (I went up to 5, as that was the max I had in my system)
[ManagerFirstLevel] =
LOOKUPVALUE (
SystemUser[fullname],
SystemUser[systemuserid],
PATHITEMREVERSE ( SystemUser[ManagerHierarchy], 2, TEXT )
)ManagerSecondLevel =
if (SystemUser[HierarchyDepth] >= 3,
LOOKUPVALUE (
SystemUser[fullname],
SystemUser[systemuserid],
PATHITEMREVERSE ( SystemUser[ManagerHierarchy], 3, TEXT )
), SystemUser[ManagerFirstLevel])ManagerThirdLevel =
if (SystemUser[HierarchyDepth] >= 4,
LOOKUPVALUE (
SystemUser[fullname],
SystemUser[systemuserid],
PATHITEMREVERSE ( SystemUser[ManagerHierarchy], 4, TEXT )
), SystemUser[ManagerSecondLevel])ManagerFourthLevel =
if (SystemUser[HierarchyDepth] >= 5,
LOOKUPVALUE (
SystemUser[fullname],
SystemUser[systemuserid],
PATHITEMREVERSE ( SystemUser[ManagerHierarchy], 5, TEXT )
), SystemUser[ManagerThirdLevel])
Things to note:
PathItem is used to get the value at a particular depth from the Path generated field (in this case SystemUser[ManagerHierarchy]). LookUpValue is then used to lookup that value’s fullname, so that it cant make for a pretty display value).
In my case I had to use PathItemReverse, so that a depth of 2 would give me the first manager’s value and so on. If I just used PathItem, I would have had to reverse my depth values. - You now will have a SystemUser table with the names of each manager at the different levels. You could rename the columns, to have actual title names (Manager, Vice President, etc).
- The final thing I did was to setup the hierarchy on the fields:
By doing this, you can get drill downs working. The hierarchy settings shown above will start at the bottom most level (employee) and as you click the drill down button, it will move up the hierarchy. If instead you wanted it to work the other way, you can just reorder it in reverse.
Things to know:
- This works only if you know the number of levels you are dealing with. So, the same concept would theoretically break on Accounts, which could be nested many levels deep.
- This was modeled after this power-pivot sample: https://www.daxpatterns.com/parent-child-hierarchies/
Monday, January 28, 2019
Dynamics 365–Open URL in a new window from SiteMap
The way I have found to be able to do this is by adding a web-resource HTML file with the following code:
<html> <title>New Window</title> <body> |
Then add a web-resource sub-item onto the SiteMap and point it at the web resource. That should do it!
Note about UCI: in UCI, a URL always opens in a new window, which is a change in behavior from the web-legacy interface and so you dont need the above hack to open the URL in a new window
Wednesday, January 23, 2019
Embed PowerBi Report in Dynamics CRM system dashboard
Its easy to create a dashboard that either includes the entire PowerBi dashboard (Power BI Dashboard) option.
Or you can include pieces from a PowerBi Dashboard (Dynamics 365 Dashboard and add a PowerBi tile)
The problem with this option is that they are “personal” dashboards and so you have to share them with users. This is not ideal when you have to share the dashboard with all users. Dashboards that can be made available to all users are system dashboards. But system dashboards cannot include PowerBI dashboards or tiles (why! oh! why!)
Here is a less than ideal workaround (not ideal, as you cant share a PowerBi dashboard or tile). You can only embed a full powerBi report (because we will be embedding it as an iframe).
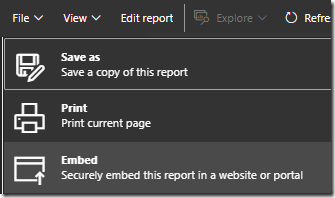
- First, you need to make your report available for embedding. You do this by opening your PowerBi report online (app.powerbi.com) and then click File >> Embed
- The next dialog will provide you a URL, copy it
- Create a new Dashboard by going to “Customizations” in Dynamics CRM
- Add an iFrame component onto your dashboard and set the url to the one you copied above:
That will make your entire PowerBi dashboard available on the Dynamics CRM dashboard.
PowerBi–Dynamics 365 (Online) Connector vs Common Data Service for Apps Connector
Its been a while since I have looked at the CDS connector, so I thought I would go looking and here are some things I found:
PowerBi desktop version: December 2018
The CDS connector is still in beta!
And still provides the warning:
The one big thing I noticed right of the bat is that the dialog doesnt allow the usage of parameters (more on a work around later).
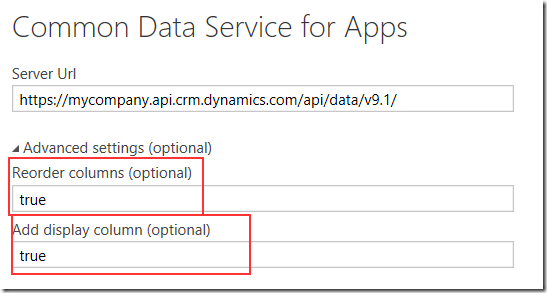
There are 2 new settings (that I havent seen earlier): Reoder columns and Add display column. Setting them both to true leads to a couple of very awesome improvements over the the Dynamics Online connector:
First, the columns are all alphabetized! If you have ever had to look for a column with the old connector (we have 200 fields on account), you know how amazing having ordered columns is!
Second, is that you now get the display value in addition to the actual value! hallelujah!
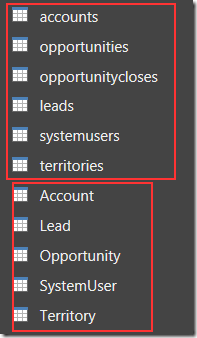
Once you select your entities and load your source, you see the next nice difference, tables are named with their singular names instead of the plural names. This used to drive me crazy and I like using the singular names, so in my opinion – cool!
In the image above, the first set of tables was loaded using the Dynamics 365 (online) connector. The 2nd one was created using the Common Data Service for Apps connector. Something to note is that you can still access the old named tables under the “System” node when you are selecting the entities.
Back to the issue of not being able to use parameters:
If you click on the “Advanced Editor”, you can update the connection to use a parameter:
let
Source = Cds.Entities(#"Sales CRM URL", [ReorderColumns=true, UseFormattedValue=true]),
entities = Source{[Group="entities"]}[Data],
accounts = entities{[EntitySetName="accounts"]}[Data]
in
accounts
In the example above, "Sales CRM URL" is a parameter that I have defined and points at the CRM api url. And the CDS connection still works. So its just the dialog that doesnt support parameters, but you can still use the parameter in the queries. (Be advised that you wont be able to open the dialog again for the connection.
Another thing I wanted to look at was what the file size looked like using the CDS connector vs the D365 connector and they were pretty much the same (and in fact the CDS connector:
All in all, the new CDS connector works great and also includes many of the entities that didnt show up before (eg: leads). I just wished that it would graduate from beta soon!