Thursday, January 31, 2008

nuvifone: A cellphone by a GPS device maker

3cq408In a surprise move - Garmin announced that it was going to start selling a cell phone starting Q3 2008. This might turn out to be an extremely interesting device - as Garmin has been producing the Nuvi GPS system - one of my favorite - for a while. It obviously remains to be seen - how much of that experience developing great GPS devices will be transferred to the NuviPhone.

The biggest thing running for this phone is that Garmin has a pretty good mapping software and also has the data. It remains to be seen if they can add on functionality that will make it as interesting as the iPhone.

Finally - if the iPhone begins supporting GPS devices via a blue-tooth interface - I wonder what users would go for - Google Maps with location support via an external GPS device - or a cell phone with integrated GPS and in-built maps. Personally I would go for the later - as I would know that I will have access to my maps - driving through any location in any country.

More information at Gizmodo : nuvifone: Garmin Drops a Phone into the GPS and Garmin : http://www8.garmin.com/nuvifone/

untitled

Wednesday, January 30, 2008

My Cool New Calling Card

As I have been taking part in a lot of developer events around town - I have found that I needed a calling card - for no better reason - then being able to advertise my blog's address.

The following is what I came up with using creative commons licensed images from flickr - which were then mosaiced together and dropped on a template document.

visitingCard

As I don't have a single artistic gene in me that could come up with a cool design or logo - I think this is a cool way to come up with a calling card that is interesting. One could make it a lot more interesting by using their own pictures. The theme in my pictures is - geography, software development, robotics, technology.

For more inspiration - visit this flickr page - which has a collection of different types of cards - http://www.flickr.com/photos/dailypoetics/sets/72057594104389710/

And here is a wiki entry on business cards, visiting/calling cards and their differences.

C# 3.0 - New Language Features - Part 2

Implicitly Typed Local Variables

Implicitly typed local variables is a new compile time feature. Here is an example:

var implicitVariable = "Hello Implicitly Type Variable";
Debug.WriteLine(implicitVariable.GetType());


The above code snippet's output will be "System.String"


When one looks at the code above - the obvious question that comes up is how is "var" different from using object. Because the above code could be re-written as follows:


object oldVariable = "Hello old variable declaration";
Debug.WriteLine(oldVariable.GetType());


And the output would be exactly what the implicit type variable code would output "System.String".


So what is the point?


First of all - var - implicitly typed variables - are a compile time feature. Hence one needs to assign the var variable when its used. Thus the following are illegal statements:


var illegalStatement1;
var illegalStatement2 = null;


The reason that the above statements are illegal is that the compiler decides what the type of var variable is based on the assignment statement. In fact if you were to look at the IL code - using var or the actual data-type would result in the exact same code.


var implicitVariable = "Hello Implicitly Type Variable";
string oldVariable = "Hello old variable declaration";

Converts to

L_0008: ldstr "Hello Implicitly Type Variable"
L_000d: stloc.0
L_000e: ldstr "Hello old variable declaration"
L_0013: stloc.1


Another cool features connected with the var keyword? Because the implicitly typed variable is a compile time feature and the variable is assigned a type based on the assignment statement, one has full intellisense available for that variable.


Hence - in the following screen shot - intellisense for the string datatype members is available for the variable implicitVariable, but not for the variable oldVariable - which is of type object.
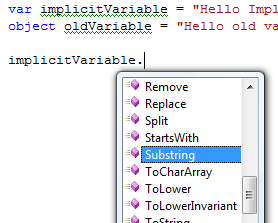
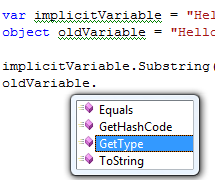

5 6


The place that I have found the var keyword most useful is when I need to enumerate over a collection. Often times one doesn't know what the type of the returned elements are when performing a foreach enumeration. By using the var keyword - one doesn't need to know the exact type of the returned objects and yet intellisense will be available for the objects - making it easy to discover methods and write code.


Dictionary<string, string> simpleDictionary = new Dictionary<string, string>();
simpleDictionary.Add("Hello", "A greeting in english");
simpleDictionary.Add("Raj", "Name of owner of this blog");
simpleDictionary.Add("brachypterous", "Having very short or rudimentary wings, as certain insects");

//old form of iteration
foreach (KeyValuePair<string, string> kyPair in simpleDictionary)
Debug.WriteLine(kyPair.Key + " " + kyPair.Value);
//new form of iteration using var keyword.
//use of var - makes intellisense available on the values of the enumeration
foreach (var dictionaryItem in simpleDictionary)
Debug.WriteLine(dictionaryItem.Key + " " + dictionaryItem.Value);
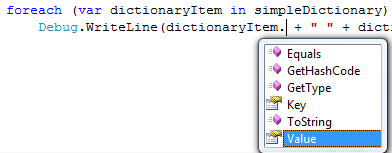


7


Intellisense available on the dictionaryItem as it was defined as a implicitly typed variable (var).


Finally, as this is a C# 3.0 feature - it can be used with modules that have been built against version 2.x of the .NET framework and is not isolated only to the 3.x versions of the framework.


The above is an example of a very simple use of the var type. People get most excited when it is used with LINQ - language integrated queries.


Next up - Automatic Properties.

Tuesday, January 29, 2008

Visual Studio 2008 - New Features - Part 1

In the next few posts - I am going to discuss the new features that are available in Visual Studio 2008, as well as those that are part of C# 3.0 language specification.

VS 2008 Feature : Multi-Targeting Support

Most of us are familiar with platform targeting. This is where we can build a module so that it can run on "Any CPU", "x86" machines and "x64" machines. This platform targeting can be done via the project's "Build" property page.

1

But to build .NET modules that work with a certain .NET framework - required you to use the appropriate version of Visual Studio

Visual Studio Version .Net Framework Version
VS 2002 1.0
VS 2003 1.1
VS 2005 2.0

This made it a royal pain if you had to support multiple .NET frameworks (which typically required one to keep different versions of project and solution files - for each version of Visual Studio/.Net Framework that one wished to use).

With VS2008 - the multi-targeting support feature allows one to use the IDE to define the target framework. This makes it extremely easy to create .NET modules that target different versions of the .NET framework.

The only caveat - versions 1.0 and 1.1 are not supported. VS2008 allows one to re-target to 2.0, 3.0 and 3.5 versions of .NET.

There are two ways in which one can specify the target .NET framework. When you create a new project, the new project dialog has a combo box that allows you to specify the framework version.

2

The second method is used to re-target framework version once the project has been already created: Accessed via the project's "Application" property page.

3 

Being able to re-target the framework - doesn't only simplify project management - but also allows you to use all the great features that are part of VS 2008.

The re-targeting is very well integrated into IDE. Once you choose a new framework target the "Add References" dialog will gray out dlls that aren't made for that framework.

4

In addition - the toolbox will show only those controls that are again meant for that framework.

For more information about this feature check - Scott Gu's blog - VS 2008 Multi-Targeting Support

Thursday, January 24, 2008

An Extensive Examination of Data Structures

An older set of articles that goes into depth on data-structures used often by software engineers. These were authored by Scott Mitchell from 4GuysFromRolla.com

Part 1: An Introduction to Data Structures
Part 2: The Queue, Stack, and Hashtable
Part 3: Binary Trees and BSTs
Part 4: Building a Better Binary Search Tree
Part 5: From Trees to Graphs
Part 6: Efficiently Representing Sets

More C# examples can be found at http://msdn2.microsoft.com/en-us/library/aa289528(VS.71).aspx

Will mouse clicks go the way of the dinosaurs?

1If this site has its way - then in the future we may no longer have to perform mouse clicks. The dont click it site promotes a no-click mouse input interface as a much more efficient and ergonomic way to give input to a computer.

Instead of mouse clicks - one uses the hover time or mouse gestures to determine if an object has been selected or "clicked".

Having tried the site - I found it hard to stop clicking on links and buttons out of force of habit. But I am sure such an interface would definitely keep my thumbs going strong for many more years.

www.dontclick.it


2 A statistic from the Dont Click It site. It is interesting to see how many of us have become hard-wired to use mouse-clicks even on a site that requires no mouse clicks.

Tuesday, January 22, 2008

Compiler Features in C#3 and VB9

from: The Moth: Compiler Features in C#3 and VB9

OpenSource project - SpatialViewer

Spatial Data Viewer


A C# OpenSource project for easy viewing of spatial data.
The current release has the following functionality: (from summary page)

  1. Draw points, Lines and polygons
  2. Auto close lines and polygons
  3. Draw with Freehand or with fixed lines(using shift key)
  4. Zoom in and out of drawing (scroll bars not yet implemented)
  5. Enter 1 or geometries by text.
  6. Text Geometries are validated and errors displayed
  7. Display geometries in text and graphical form
  8. Select and highlight geometries from a grid
  9. Select geometries using drawing pane by using another geometry (lasso style selection)
  10. Snap to grid. Restricts points to whole numbers

The Spatial Data Viewer project was started by SimonS whose blog is a good resource on SQL Server 2008 - Katmai. (Many of his latest entries are on using SQL Server 2008 with spatial data). http://sqlblogcasts.com/blogs/simons/

Friday, January 18, 2008

ZIP Code Information

In connection with my previous post on visualizing US ZIP codes, here are some links to ZIP code data.

From: http://www.sdc.ucsb.edu/holdings/zip_codes.txt

The Census Bureau has been providing ZIP Code area centroids which is probably the dataset used in the distance calculation routines. To overcome this mapping difficulty, the Census Bureau has created the ZIP Code Tabulation Area (ZCTA) by using aggregations of Census blocks. But they warn that there is no correlation between the US Postal Service ZIP Codes and the US Census Bureau-created geography of those ZIP Codes. Each of datasets should be used with full knowledge of their method of creation and intended uses.

US POSTAL SERVICE ZIP Code Lookup and Address Information page http://www.usps.com/ncsc/ziplookup/lookupmenu.htm

ZIP Code FAQ
http://www.usps.com/zip4/zipfaq.htm

ZIP Code lookup service
http://www.usps.com/zip4/welcome.htm

US CENSUS BUREAU ZIP Code information and FAQs http://www.census.gov/geo/www/tiger/tigermap.html#ZIP
http://www.census.gov/cgi-bin/geo/tigerfaq?Q16
http://www.census.gov/cgi-bin/geo/tigerfaq?Q17
http://www.census.gov/cgi-bin/geo/tigerfaq?Q18
http://www.census.gov/cgi-bin/geo/tigerfaq?Q19
http://www.census.gov/cgi-bin/geo/tigerfaq?Q20

Census 2000 U.S. Gazetteer Files
http://www.census.gov/tiger/tms/gazetteer/
http://www.census.gov/geo/www/gazetteer/places2k.html

ZIP Code Tabulation Areas
http://www.census.gov/geo/ZCTA/zcta.html
http://www.census.gov/prod/2001pubs/mso01zcta.pdf

2000 5-Digit ZIP Code Tabulation Areas
http://www.census.gov/geo/www/cob/z52000.html

2000 3-Digit ZIP Code Tabulation Areas
http://www.census.gov/geo/www/cob/z32000.html

Text file of ZIP Codes and centroids
http://www.census.gov/ftp/pub/tiger/tms/gazetteer/zips.txt http://www.census.gov/geo/www/gazetteer/newpagefiles/zip90r.txt

1990 ZIP Code file with lat/lon centroids
http://www.census.gov/geo/www/tiger/zip1999.zip

MISCELLANEOUS

Zip Codes are Not Areas! http://exchange.manifold.net/manifold/manuals/5_userman/mfd50Zip_Codes_are_Not_Areas.htm

As with most public domain data, there are many commercial enhancements and services created with specific uses of the data in mind. Here is just one such company:
http://www.zipdatafiles.com/data/

Zip Codes - the method behind the madness

Ever wondered if there is pattern behind the U.S zip code system? Here is a very nice interactive tool that allows you to discover the pattern behind the pin code system. zipdecode | ben fry

1 

Once you have figured out how the zip codes are spread out across the U.S, check out this site, which visualizes the pin codes by connecting them up in ascending order. (ZIPScribbled)

scribbled

And in this map, the zip codes were unraveled using a Hilbert Curve. (Travelling Presidential Candidate Map)

scribbled2

Thursday, January 17, 2008

Making the Most of Maps - Google Docs

A very good presentation covering what one should do at a minimum to make their mashup maps better.

Making the Most of Maps - Google Docs

Wednesday, January 16, 2008

Registry 101

An excellent article on some basic information every developer should know about the registry. The article touches on information such as how the data is stored, where its stored as well as where some of the important pieces of information that developers typically need access to are stored.

For example:

Did you know that the CLASSES_ROOT reflects the CLASSES information from the local machine and current user hives?

Read more at : Ask the Performance Team : Windows Architecture - Registry 101

Tuesday, January 15, 2008

Internet Explorer finally gets "As you type" search

Internet explorer has been my default browser for a long time. I like it better than FireFox (OMG!) and for the work I do and the websites that I visit - it works best. Only occasionally do I have to whip out FireFox to visit a "non-compliant" web-page.

Though there has been one feature that I always missed in Internet Explorer that I had grown to love in FireFox: the "as you type" search feature. In FireFox, whenever you hit CTRL+F, it would open up the find toolbar at the bottom and as you typed a word into the find box, the word would get highlighted in the browser. If there was more than one match - then you could view them via the provided buttons.

1 Firefox's search bar

In Internet Explorer (even the most recent version IE 7), when you hit CTRL+F, you get the good old find dialog that one finds in all the staple desktop applications like Notepad, etc.

2 Internet Explorer's native Find dialog

In this day and age and after so many years of FireFox's goodness being out there - you would have thought that Microsoft would have added this type of a search in its Internet browser. No such luck! Go Figure! Though the find as you search was available via a IE add-in called "findasyoutype" written by Sven Groot.

Well, today I upgraded to the Google Toolbar version 5 beta for Internet Explorer. I hit CTRL+F and what do you know - no crappy old Microsoft Find dialo5g, but an actual Find As You Type toolbar pops up at the bottom.

3 Google's Find toolbar for IE 

The find as you type toolbar pops up when you press CTRL+F, or click on the Find button 4 on the Google Toolbar. In addition the Find button's drop down lists all the words that were used to perform a Google Search. (Google Toolbar Word Find)

Google just gave me another extremely important reason to stay with their toolbar instead of using the Microsoft search toolbar.

Try the new: Google Toolbar 5 beta for IE.

All features: http://toolbar.google.com/T5/intl/en/features.html

The only feature that I don't like right now is the redesigned way in which one adds bookmarks to the Google Toolbar. Previously, it used be a normal dialog. Now its a balloon that is not rendered correctly and feels very clunky. Hope it gets a make-over or returns to the original style by the time the final version is released.

6 Save Bookmark to Google Toolbar - balloon.

Thursday, January 10, 2008

Free Neighborhood Geocoding

This information has appeared all across the GIS blogosphere. Urban Mapping has 11 methods as part of its API - that allows for geo-coding using neighborhood information. What is news worthy is the fact that the following 4 methods have been opened up for free access.

  • getNeighborhoodDataByID
  • getNeighborhoodsByLatLng
  • getNearestNeighborhood
  • getNeighborhoodsByName
  • Documentation and more information available from : http://ws.urbanmapping.com/neighborhoods/doc

    Get Rid Of Telemarketers

    This information is so useful that it would be shameful to not share it.

    I keep getting "harassed" by unwanted phone calls. The worst are the automated ones - as there is no one to tell - "Please take my number of your calling list".

    This guy has recorded the "Out of service" or "Phone number non-existent" tone. Record it at the beginning of your answering machine's message - and the bot will think that it has reached a number that has been disconnected. According to this blogger - it made all his bot calls go away - that's got to be gold!

    Will update on how it works for me!

    The file can be downloaded from the bottom of the guy's post. Telemarketers: Get Rid Of Telemarketers, Debt Collectors, And Other Vermin With Phone Tones

    Top Ten Myths of Entrepreneurship

    A good article from Guy Kawasaki's blog about the top ten myths about entrepreneurship.

    From How to Change the World: Top Ten Myths of Entrepreneurship
    This post was written by Scott Shane as a follow up to his entrepreneurship test.

    I have highlighted the portions that I think are the important take away points for each of the myths.

    1. It takes a lot of money to finance a new business. Not true. The typical start-up only 1 requires about $25,000 to get going. The successful entrepreneurs who don’t believe the myth design their businesses to work with little cash. They borrow instead of paying for things. They rent instead of buy. And they turn fixed costs into variable costs by, say, paying people commissions instead of salaries.

    2. Venture capitalists are a good place to go for start-up money. Not unless you start a computer or biotech company. Computer hardware and software, semiconductors, communication, and biotechnology account for 81 percent of all venture capital dollars, and seventy-two percent of the companies that got VC money over the past fifteen or so years. VCs only fund about 3,000 companies per year and only about one quarter of those companies are in the seed or start-up stage. In fact, the odds that a start-up company will get VC money are about one in 4,000. That’s worse than the odds that you will die from a fall in the shower.

    3. Most business angels are rich. If rich means being an accredited investor –a person with a 2 net worth of more than $1 million or an annual income of $200,000 per year if single and $300,000 if married – then the answer is “no.” Almost three quarters of the people who provide capital to fund the start-ups of other people who are not friends, neighbors, co-workers, or family don’t meet SEC accreditation requirements. In fact, thirty-two percent have a household income of $40,000 per year or less and seventeen percent have a negative net worth.

    4. Start-ups can’t be financed with debt. Actually, debt is more common than equity. According to the Federal Reserve’s Survey of Small Business Finances, fifty-three percent of the financing of companies that are two years old or younger comes from debt and only forty-seven percent comes from equity. So a lot of entrepreneurs out there are using debt rather than equity to fund their companies.3

    5. Banks don’t lend money to start-ups. This is another myth. Again, the Federal Reserve data shows that banks account for sixteen percent of all the financing provided to companies that are two years old or younger. While sixteen percent might not seem that high, it is three percent higher than the amount of money provided by the next highest source – trade creditors – and is higher than a bunch of other sources that everyone talks about going to: friends and family, business angels, venture capitalists, strategic investors, and government agencies.

    6. Most entrepreneurs start businesses in attractive industries. Sadly, the opposite is true. Most entrepreneurs head right for the worst industries for start-ups. The correlation between the number of entrepreneurs starting businesses in an industry and the number of companies failing in the industry is 0.77. That means that most entrepreneurs are picking industries in which they are most likely to fail.

    7. The growth of a start-up depends more on an entrepreneur’s talent than on the business he chooses. Sorry to deflate some egos here, but the industry you choose to start your 4 company has a huge effect on the odds that it will grow. Over the past twenty years or so, about 4.2 percent of all start-ups in the computer and office equipment industry made the Inc 500 list of the fastest growing private companies in the U.S. 0.005 percent of start-ups in the hotel and motel industry and 0.007 percent of start-up eating and drinking establishments made the Inc. 500. That means the odds that you will make the Inc 500 are 840 times higher if you start a computer company than if you start a hotel or motel. There is nothing anyone has discovered about the effects of entrepreneurial talent that has a similar magnitude effect on the growth of new businesses.

    8. Most entrepreneurs are successful financially. Sorry, this is another myth. Entrepreneurship creates a lot of wealth, but it is very unevenly distributed. The typical profit of an owner-managed business is $39,000 per year. Only the top ten percent of entrepreneurs earn more money than employees. And the typical entrepreneur earns less money than he otherwise would have earned working for someone else.5

    9. Many start-ups achieve the sales growth projections that equity investors are looking for. Not even close. Of the 590,000 or so new businesses with at least one employee founded in this country every year, data from the U.S. Census shows that less than 200 reach the $100 million in sales in six years that venture capitalists talk about looking for. About 500 firms reach the $50 million in sales that the sophisticated angels, like the ones at Tech Coast Angels and the Band of Angels talk about. In fact, only about 9,500 companies reach $5 million in sales in that amount of time.

    10. Starting a business is easy. Actually it isn’t, and most people who begin the process of 6 starting a company fail to get one up and running. Seven years after beginning the process of starting a business, only one-third of people have a new company with positive cash flow greater than the salary and expenses of the owner for more than three consecutive months.

    Thursday, January 03, 2008

    Installing Dell Wireless 355 Bluetooth module in Inspiron Laptop

    430-2341I wanted to try and connect to the Wii's remote and use it as a input interface on my windows laptop. The Wii's remote uses Bluetooth to connect to the console. So I needed to add a blue tooth module to my laptop.

    My laptop is a Dell Inspiron 1520. The Dell wireless 355 Bluetooth module is made for this laptop. (The 355 module also works for many other Inspiron models, though the installation instructions might be a little different based on the model).


    Here are the step by step instructables to get the 355 module into your Inspiron.

    Tools needed:

    A plastic scribe. (If you cant find a plastic scribe you can use a flat head screw-driver (but be careful as it is very easy to leave dents, scratches and nicks in the plastic areas that you will be working around).

    PC311175

    1. Disconnect the power and remove the battery from your laptop.
      PC311176
    2. Turn over the laptop and open the LCD screen all the way - so that it lays almost flat.
      PC311177
    3. The Bluetooth module goes in a slot located under the hinge cover. To remove the hinge cover you need to use the flat scribe or screw-driver to gently lift the cover up from the front of the laptop.
    4. The hinge cover has a small notch/slot located on the right hand side corner towards the LCD screen. This notch will help you get started in releasing the hinge cover.
      Untitled
    5. The hinge cover is held in place by tabs that lock into the laptop body.
      PC311181 
    6. You will want to start by inserting the scribe into the notch and then gently pushing down the scribe to release the tabs holding the hinge cover in place.
      csl_hin6
    7. As you release the hinge cover (first at the notch) move down towards the keyboard and then work yourself from the right side to the left. You shouldn't have to apply to much force. As you slowly lift the hinge cover from the right side and move towards the left side - the tabs will release and the hinge cover will open up.
      PC311179
    8. Notice that on the left hand side - there are two flat tabs that go flat into the laptop's body. When you arrive at this spot - you should just be able to slide out the hinge cover (if you keep trying to lift up the hinge cover - you risk breaking these tabs).
      PC311180
    9. Once you have removed the hinge cover you will see the slot into which the blue tooth module will sit.
      (Large pink circle area). This area has 3 slots/tab (blue) into which the module will seat. And finally the connector cable will connect the module to your laptop.
       PC311183a
    10. Insert the blue tooth module so that it sits under the slots.
      To do this - hold the blue tooth module by its connector end and then slide it into and under the slots.
      corsic17
       PC311187
    11. Finally insert the connector into the Bluetooth module. (The connector will go in only one way - so don't force it too hard).
      PC311188
    12. Now re-attach the hinge cover.
      Start on the left side by sliding the 2 tabs into the laptop body.
      Working from left to right gently press down on the hinge cover so that the tabs engage and lock into the laptop body.
    13. Re-attach the battery and power cable and start-up your laptop.
    14. In my case the laptop came with the drivers required for the blue-tooth module and Vista started installing them as soon as it started up. In case you need to download the drivers - you can find them here: Dell Support


    Things to remember:

    • The hardest part of the installation is the removal of the hinge cover - as its made of plastic and very easy to break the tabs that hold it in place. So be gentle and become familiar with the picture in step 5 which shows the locations of the tabs. Move from right to left while removing the hinge cover - lifting the cover a little as you move along. When replacing the cover - move from left to right - pushing down gently - so as to lock the tabs in place.
      (I am not sure if it will be easy to purchase a replacement hinge cover - so be very very careful with it).
    • It might be easier to slide the Bluetooth module a little bit into its slot - then attach the cable and then push the model all the way in.
    • Remember static discharge is your worst enemy. As you have disconnected the laptop from the power adapter - the discharge can easily find its way to one of the many electronic components and kill your system. So discharge your self by touching some huge metal piece that is grounded - or in my case go find someone to touch and give them a fun jolt of electricity!! :)
    • Also remember the disclaimer: I am not responsible for any issues/losses you may encounter by following the above instructions. You are following them at your own risk.

    Maxtor OneTouch External Hard Drive Corruption

    from Maxtor OneTouch External Hard Drive Corruption

    Recovering from data corruption on Maxtor OneTouch external hard drives246416

    This article may help you if the following applies:
    • You own a Maxtor OneTouch external hard drive.
    • The drive was working correctly, but suddenly exhibited catastrophic data failure.
    • Your Windows computer does not recognize the drive when you plug it in, or you can not mount the drive under Linux.
    • The drive does NOT exhibit any physical drive failure symptoms.
    This article explains how I have recovered from data corruption on the Maxtor OneTouch external hard drives. About a year ago, I acquired four 300GB Maxtor OneTouch II external hard drives. I used them extensively in Linux, and one day I noticed what seemed to be like massive data corruption on the drive. All of a sudden, all the directory and file names were corrupted, and I could not read from any of the files. Power cycling the drive did not help, and I could not read it from Windows either. I thought I had lost all of the data, but I decided to see if I could recover it using disk recovery tools. Fortunately, I found a tool that recovered the drive without any (apparent) data loss. The problem appears to be corruption of the partition table, possibly due to a buggy USB/IDE interface inside the drive enclosure. I have never encountered a similar problem with the Maxtor (internal) hard drives themselves, but I have seen the same corruption on both Windows and Linux platforms. The problem occurs most often during heavy load on the disk, for example during backup and restore.

    The tool that I used is an open source program called TestDisk. It runs under both Linux and Windows, and I have successfully used it on both. The problem again is corruption of the partition table. The tool can automatically rebuild the partition table by looking at the file system. This is how I used TestDisk to rebuild it.

    • Run testdisk as root in Linux
    • Select "Create" a new log file
    • Select the correct disk, for example "/dev/sde - 300GB / 279 GiB"
    • Select "Intel" as the partition table type, assuming you have not reformatted the drive, which should be FAT32
    • Select "Analyze" current partition structure and search for lost partitions
    • It should display one partition that looks something like "FAT32 LBA"
    • Select "Proceed".
    • Press "Enter" again to continue
    • Select "Write" to write the new partition table information
    • Press "Y" to confirm
    • Quit the program
    • "sync" under Linux or "Safely Remove Hardware" in Windows
    • Power cycle the drive

    This should recover the drive, but I am not sure if data corruption occurs in any other part of the drive except for the partition table. My recommendation for preventing further data loss is to copy your data to another drive (non Maxtor) and not use the drive, or store your files in self-validating file systems or file formats on this drive.

    DISCLAIMER: I am not responsible for any further loss of data you may encounter by following the above instructions. I sincerely hope you do manage to recover your data.


    Taking apart the Maxtor One Touch 4 500gb Drive:

    Remove the sticky rubber feet and the Maxtor label. There is one screw under the label, remove it.
    Looking at the back of the case (power and USB connectors) with case standing upright, start by squeezing down the right hand side of the plastic top and pulling the halves gently apart, proceed working your way all around the case.
    Inside the plastic case is a metal shell. Remove all screws (including very small ones) and also the ones holding the small PCB with the push button. There are 3 large screws securing the USB interface PCB to the metal work - these do NOT need to be unscrewed (one of them is impossible to get to anyway). Once enough screws have been removed the hard drive + USB PCB will slide out from inside the main metal housing.
    The drive pulls straight off the header on the USB PCB.

    Head Tracking using the WiiRemote (a Johnny Lee production!)

    YouTube - Head Tracking for Desktop VR Displays using the WiiRemote

    Johnny Lee does it again..... this time he uses the WiiRemote to do head-tracking. The results are awesome. The video is a must see to see how realistic 3D environments can be made using head-tracking.

    Head tracking - is where hardware is used to detect the person's head relative to the display. Tracking the head - lets the software know where the user is looking and hence can change the display - thereby giving the user a 3D view into a 2D display. Check out the video and it will all make sense!


    link to Johnny Lee's web page: http://www.cs.cmu.edu/~johnny/projects/wii/

    link to Johnny Lee's blog: http://procrastineering.blogspot.com/